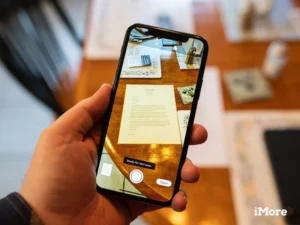
Apple’s document scanner might be the only scanner you’ll ever need, ever again.
If you’ve been using an iPhone for a few years, you probably have tried several of the best iPhone document scanner apps in your lifetime. I know I have. I have my favorites. I keep a couple of them in my Productivity folder on my iPhone and iPad.
If you’re tired of storing extra apps, just for the purposes of scanning a business card, flier, or document every once in a while, you’re about to be free of the multi-app grind.
In iOS 15, Apple’s document scanner is hidden inside the Notes app, and because it supports in-app sharing, you can store the newly scanned document anywhere you want. Here’s how.
How to scan a document on iPhone and iPad
The document scanner is tucked away in the Notes app on iPhone and iPad. With just a couple of taps, you’ll have a solidly scanned document ready to mark up, convert to PDF, and share with another app.
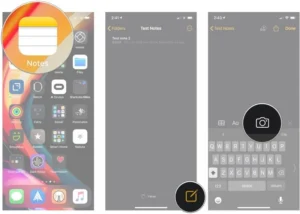
Open Notes on your iPhone or iPad.
Create a new note or tap on an existing one to add a document to it.
Tap the camera button at the bottom of the screen or above the keyboard.
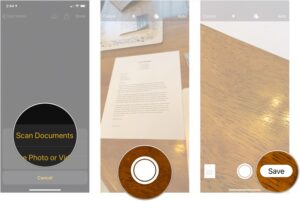
Tap Scan Documents.
Line up the document you want to scan.
Tap the shutter button if the scanner doesn’t automatically scan the document. Repeat this step for every document you want to scan.
Tap Save after you’ve scanned all of the necessary pages. The button will have a count of how many pages you scanned.
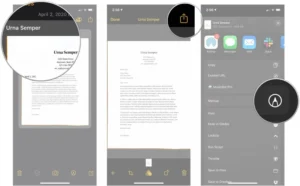
The scanned pages will populate in a new note in the Notes app.
How to mark up a scanned document on iPhone and iPad
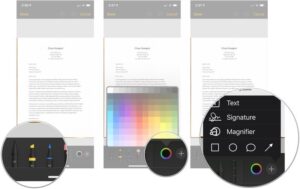
Once you’ve scanned a document, you can mark it up with any of the built-in markup tools in the Notes app. With the markup tools, you can highlight, handwrite, cut out and move sections (magic rope style), and add a text box, shape, or arrows. You can also add your signature right from within the Notes app.
Tap the scanned document in your note.
Tap the share button in the upper-right corner.
Tap Markup. You may need to scroll the action menu to see this option.
Tap on the tool you’d like to use.
Tap the color picker if you’d like to change the color that your chosen tool will use.
Tap + if you want to add a text box, signature, magnifier, or shape to your document.
Tap on the tool you’d like to use.
Tap the color picker if you’d like to change the color that your chosen tool will use.
Tap + if you want to add a text box, signature, magnifier, or shape to your document.
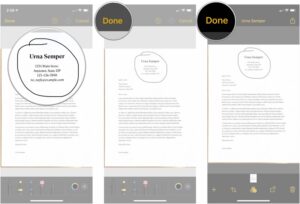
The scanned document will save all of the markup changes you made.
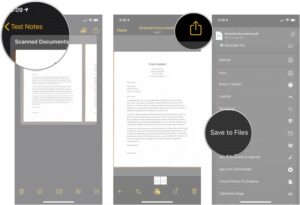
How to save a scanned document as a PDF
While you were previously required to turn your scanned documents into PDFs manually, now, the Notes app does that automatically. But you will need to save your scanned document to someplace like the Files app. Here’s how to do that.
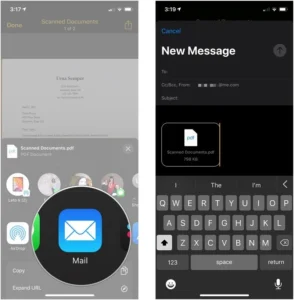
Tap your scanned document.
Tap the share button in the upper-right corner.
Tap the app that you want to save your PDF to and follow that app’s procedure for saving a file.
How to share a scanned document on iPhone and iPad
Want to send your scanned document to a friend, family member, or colleague? You can do that easily from the Notes app.
Tap your scanned document.
Tap the share button in the upper-right corner.
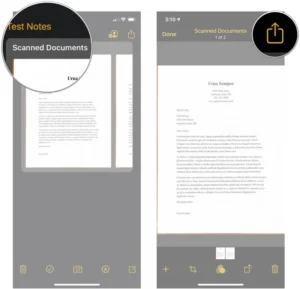
Tap on the app with which you want to share the note using.
Share your PDF.
How to delete a scanned document on iPhone and iPad
Tap your scanned document.
Tap the trash can in the bottom-right corner.
Tap Delete Scan.
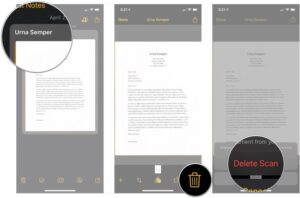
You will only delete the specific scanned page you’ve selected. If you want to delete the entire document, simply delete the note.
Get scanning
The above guidance should be all you need to convert some physical documents into digital versions, store them, share them, and more. You might find that the Notes app document scanner is powerful enough for your needs that you can ditch the dedicated app you were using before.